Description
The express2html converter creates a web-browsable version of an EXPRESS information model. The tool preserves the layout, indentation and comments in the EXPRESS while adding hypertext links and cross reference information. This is not just a text formatter, but rather generates a report for each entity in the information model giving a more complete picture of the inheritance and attributes than is available explicitly in the EXPRESS.
In normal operation, the express2html tool reads the EXPRESS source files and generates one HTML page for each EXPRESS definition in a schema (entity, type, function, procedure, etc.) as well as a frame page that ties everything together. Each definition has a table of links to other definitions that use it, and ENTITY types also have tables listing all attributes, (both inherited and local) supertypes and subtypes.
Command Line
express2html [options] expfile1 [expfile2 ...]
- -help
- Display usage information
- -version
- Display the version number of the tool.
- -title <text>
- Set the title of the generated HTML to the specified string.
- -exit <url>
- Set the target URL for the exit link. An exit link is only created if this option is specified.
- -exittext <text>
- Specify the text to be the exit link. The default is [Exit]. This option is ignored if the -exit option is not specified.
- -terse
- Eliminate the sentences describing the sections from the HTML.
- -hide
- Eliminate empty section from the report. For example if an entity has no supertypes, and this option is selected. the Supertypes section will not appear in the output for that entity.
- -nojs
- Eliminate the JavaScript from the output. By default, JavaScript is emitted to enable the tables to be sorted by column.
- -maxsubtypes <number>
- Specify the maximum number of subtypes to include as a vertical list. If an entity has more subtypes than this number, they are listed horizontally to save space. The default value is 10.
- -nocredit
- Do not include STEP Tools credits on the summary page.
- -onefile
- Generate a single output file. In this case, the output consists of only the HTML marked-up EXPRESS, and does not include any summary information.
- -frames
- Generate multiple output files with summary information. (This is the default operation of the tool.)
- -o <path>
- Set the output location. If -onefile is in effect, this option specifies the HTML file where the output is written. If not specified, the output will be written to express.html
If -frames is in effect, this option specified a directory into which the output files are written. If not specified, the output will be written to the express_html directory.
- -truncate
- When creating frames, limit files names to 10 characters (excluding the .html file extension). This is helpful when generating HTML for publication on CD-ROM or other file systems.
- -comment-before
- Comments appear before the definition to which they apply. (This is the default)
- -comment-after
- Comments appear after the definition to which they apply.
- -comment-global
- Used to indicate that comments in the global scope do not apply to either the preceding or the following definition.
Windows Control Panel
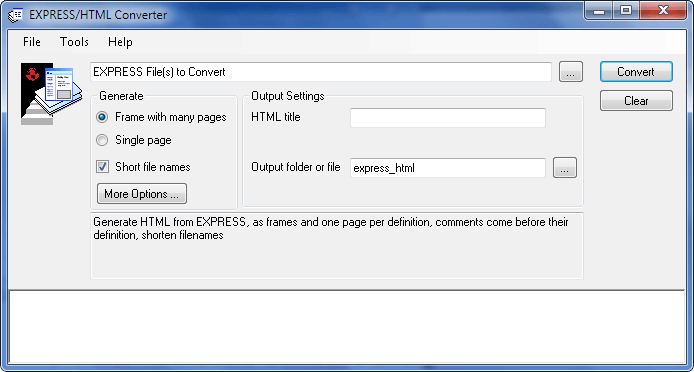
The EXPRESS to HTML Windows control panel is shown below. Run this by selecting EXPRESS to HTML from the Start Menu. The following sections describe the fields and setting on this control panel and show how to perform various tasks with the converter.

Generating HTML Output
At the top of the EXPRESS to HTML control panel is a text field for one or more schema files that you would like to compile. You can open the file dialog using Ctrl+O or the [...] button to the right. You can also drag and drop files from the Windows Explorer.
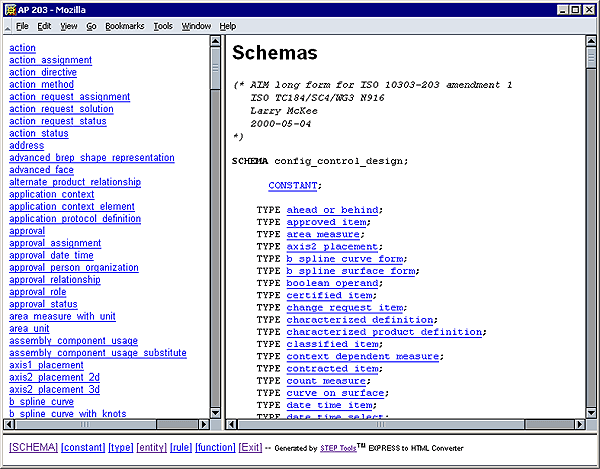
The converter generates an web page for each entity, defined type, or other definition. It also generates index pages and a frameset to simplify navigation. The left panel provides an alphabetized index of either entities, defined types, functions or procedures. The right frame contains the formatted definition. The bottom frame is used to select an index to be displayed in the left frame. The [all definitions] tag in the bottom frame selects the summary page.

In the output directory, the frameset is written into a file named index.html. You should point your web browser at this file when you want to view the hypertext version of the information model.
The summary page schema.html contains the HTML for the global information in the EXPRESS source. This includes the SCHEMA/END_SCHEMA declaration, CONSTANTs, USE and REFERENCE statements, and comments that appear in the global scope that the processor did not include on an HTML page for a definition. In place of those definitions the summary page includes a hypertext link to the page containing the definition.
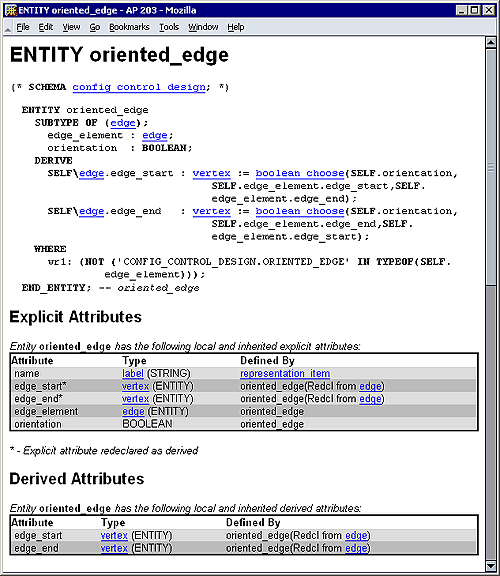
The processor places all entities, defined types, global rules, subroutines and functions on their own HTML pages. In addition to the hyperlinked EXPRESS source, the pages for entity and defined types include a cross reference report at the bottom of the page. This report includes attribute summaries, subtypes and supertypes, and the types and entities that reference the entity.
The converter generates tables for each entity to summarize the entity's attributes. For each entity, the tool generates summaries for explicit, derived, and inverse attributes. These tables give the attribute name, the attribute's type and the entity (possibly a supertype) that defined the attribute. The explicit attributes in the table are listed in the same order that they appear in a Part 21 exchange file.

The EXPRESS language allows explicit attribute to be redeclared as DERIVED. In this case, the attribute, even though it is a derived attribute, it is also included in the table of explicit attributes. It is indicated as such with a * and a footnote. In Part 21 files these attributes are encoded as "*".
The second column of the attribute table identifies the attribute's type. The type is specified as the EXPRESS type that it is actually declared as, and if that type is a named type, the underlying type (e.g. BOOLEAN, STRING, ENTITY, ARRAY, etc.), is also given in parenthesis. This feature makes it easy to determine the underlying type of defined types.
Both entity and defined type pages include a report identifying the other types that reference the current type. This section allows you to see where in the information model an entity or type is used, and effectively provides a back link for the hypertext links in the formatted EXPRESS.
Customizing the HTML Output
The converter has a range of options for customizing the output web pages. The checkboxes in the Generate area control how the EXPRESS definitions will be converted to web pages.
The Frame with many pages option generates detailed reports for each definition. The Single page option or -onefile command line flag tags all of the definitions with hyperlinks but does not generate any other reports.
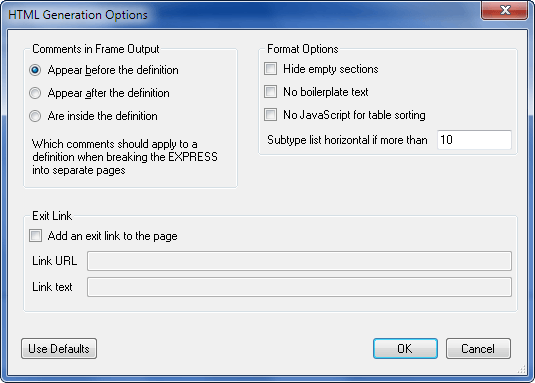
You can specify title text for the web pages using the HTML title field or the -title command line option. The More Options button brings up an options dialog with even more settings.

When generating multiple files, the tool needs to determine where one definition ends and another begins. Such splitting can be performed anywhere between the end of the preceding definition and the beginning of the next one. The splitting strategy must handle comments that lexically occur between definitions, but actually document either the following, or the preceding definition in the information model.
The Comments in Frame Output options determine where the converter will break the EXPRESS into separate files. You can indicate that definitions are described by comments that appear before it, after it, or neither. Given the following information model:
SCHEMA flying_monkeys;

(* The census entity is used to hold a count of how many flying
   monkeys have passed a point, and the time at which the last one
   was observed.
*)
ENTITY census;
  monkey_count : integer;
  last : time;
END_ENTITY;  --census

(*
  The bite entity is used to keep track of when a flying monkey bites a
  person, and, whether or not the person was infected with rabies by the
  monkey.  If known, the ID tag from the collar of the monkey is also
  recorded.
*)
ENTITY bite;
  victim : STRING;
  infected : LOGICAL;  (*Logical because the status may not be known*)
  monkey : OPTIONAL id;
END_ENTITY;  --bite

END_SCHEMA;
There are comments in the schema scope that come before the definition they document. In this case, use the Appear before the definition or -comment-before option to keep the comments with the associated definition. This is the default behavior. Use the Appear after the definition or -comment-after option in cases where the comments appear after the declaration.
When we use the "before" option, the output for the census entity includes the comment that appears before it, as well as the trailing comment on the same line as the END_ENTITY keyword as shown below:
(* The census entity is used to hold a count of how many flying
   monkeys have passed a point, and the time at which the last one
   was observed.
*)
ENTITY census;
  monkey_count : integer;
  last : time;
END_ENTITY;  --census
The EXPRESS is always split between lines, when possible. Thus trailing comments after the entity remain with the entity regardless of the splitting mode selected. In the above example, the trailing comment "--census" has been kept with the definition it belongs to.
The Are inside the definition or -comment-global option puts comments that are outside of a definition onto the schema summary page, not with any definition. Comment Splitting Example shows a more detailed example of how each of these options work.
The Hide empty sections option and -hide command line flag supress section headers for things that are not present in a definition, like supertypes, subtypes, etc. The No boilerplate text option and -terse command line flag supress some extra descriptive text describing each section.
The generated lists of local and inherited attributes normally contains some JavaScript code that can sort the lists by different columns. The No JavaScript for table sorting option and -nojs command line flag supress this code and emit static tables.
The page for each entity lists all types derived from it, either directly or through intermediate entities. This list is easiest to read when formatted vertically, with one definition per line, but this list can get very large for base types of a large inheritance hierarchy. The Subtype list horizontal if more than option and -maxsubtypes command line flag give the size at which that list switches to a more compact horizontal layout.
The Exit Link option and -exit/-exittext command line flags add a link to the bottom of every page.
Examples
Generate a set of HTML pages for the AP203 schema. The output is placed into a directory named express_html:
% express2html ap203.exp
Generate a single HTML file. This will contain a the EXPRESS schema with hyperlinks for each symbol usage, but will not have the summary tables for each definition. The output is placed into a file named express.html:
% express2html -onefile ap203.exp
Create a set of pages in the directory ap214 with the page titles set to AP 214. We must quote the title to insure that the whitespace is correctly interpreted.
% express2html -o ap214 -title "AP 214" ap214.exp
Generate a set of pages for the STEP integrated resources. The output is written to a directory named IRs.
% express2html -o IRs p41.exp p42.exp p42.exp p43.exp p44.exp p45.exp p46.exp
Comment Splitting Example
As an example of how the comment splitting options work, we will consider the following simple EXPRESS schema, and show how it gets split in each case.
(*A schema for demonstrating how splitting is done*)
SCHEMA test;
(* Comment at beginning*)

ENTITY A;
(*Comment inside A*)
END_ENTITY; --A

(*Comment between A and B*)

ENTITY B;
(*Comment inside B *)
END_ENTITY; --B

(*Comment at end*)
END_SCHEMA;
(*After the schema*)
With the -comment-after option, the summary file contains the following:
(*A schema for demonstrating how splitting is done*)
SCHEMA test;
(* Comment at beginning*)
ENTITY A;
ENTITY B;
END_SCHEMA;
(*After the schema*)
The page for ENTITY A contains the following text:
ENTITY A;
(*Comment inside A*)
END_ENTITY; --A

(*Comment between A and B*)
The page for ENTITY B contains the following text:
ENTITY B;
(*Comment inside B*)
END_ENTITY; --B

(*Comment at end*)
For the -comment-global option, the summary file contains the comments.
(*A schema for demonstrating how splitting is done*)
SCHEMA test;
(* Comment at beginning*)
ENTITY A;

(*Comment between A and B*)

ENTITY B;

(*Comment at end*)

END_SCHEMA;
(*After the schema*)
In this case, the HTML for entity A, contains the following:
ENTITY A;
(*Comment inside A*)
END_ENTITY; --A
Note that the trailing comment "--A" is still kept with the entity because it appears on the same line as the END_ENTITY keyword.