Overview
To build a STEP Tools® software application, the C++ compiler must know where the header and library files are, and what libraries to link against. The sections below describe how to do this within Visual Studio 2012-2022. The sample programs for each AP are also a great place to see how these are configured.
We use environment variables set by the STEP Tools® software installer to tell the compiler where to find the header files and libraries, The ROSE variable points to the STEP Tools® software install directory, ROSE_INCLUDE points to the header file directory, and ROSE_LIB points to a preferred library directory.
Project Templates
Visual Studio templates make quick command line programs similar to the STEP Tools® software samples. Or you can use the instructions below to manually configure a project.
Finding Header Files
Tell the compiler to look for header files in the ROSE_INCLUDE directory and sub-directory for your specific schema, such as ROSE_INCLUDE/stp_aim for the STEP AP library classes. You may need to add other sub-directories for the faceter, helper libraries, etc. The include directories are documented on the setup page for each library.
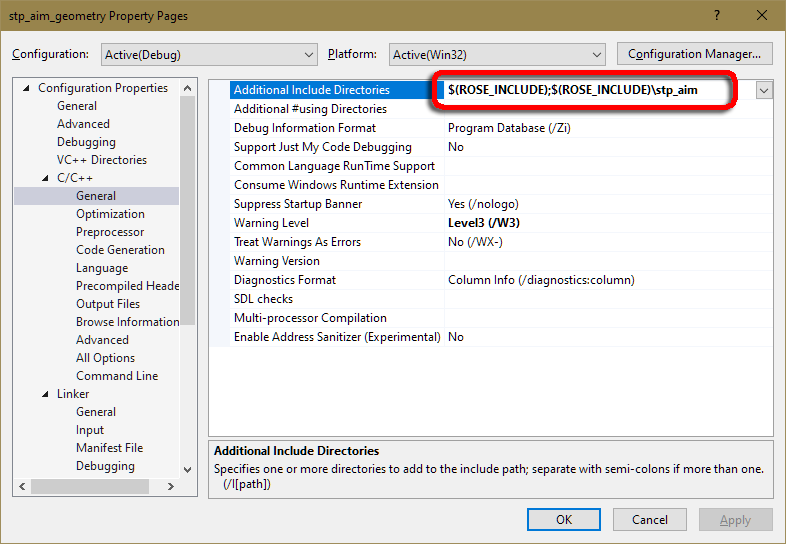
Within Visual Studio, right click on your project in the Solution Explorer and bring up the project's Properties dialog. We want to change the settings for both Debug and Release versions, so under the Configuration field, select "All Configurations".
Select the C/C++ category of properties and, pick the General options under that. In the Additional Include Directories property, add the semicolon-separated list of STEP Tools® software include directories. To get the value of the environment variable, use the syntax $(ROSE_INCLUDE) as shown below:
Linking To Static Libraries
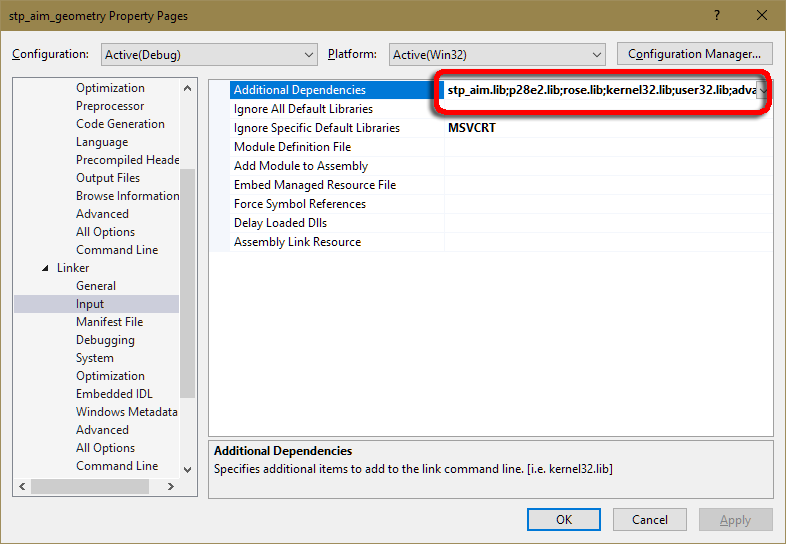
Next, you must tell the linker what library files to use. We want to change the settings for both Debug and Release versions, so in the project Properties dialog, under the Configuration field, select "All Configurations".
Select the Linker category of properties and, pick the Input option under that. In the Additional Dependencies property, add the library for your schema, such as stp_aim.lib for the STEP AP library classes. The correct library name is listed on the documentation page for each schema. Next, add the ROSE library rose.lib. If your program needs Part 28 XML support you must also add rosexml.lib to the list of libraries. Finally, add the advapi32.lib system library, which is needed for registry functions.
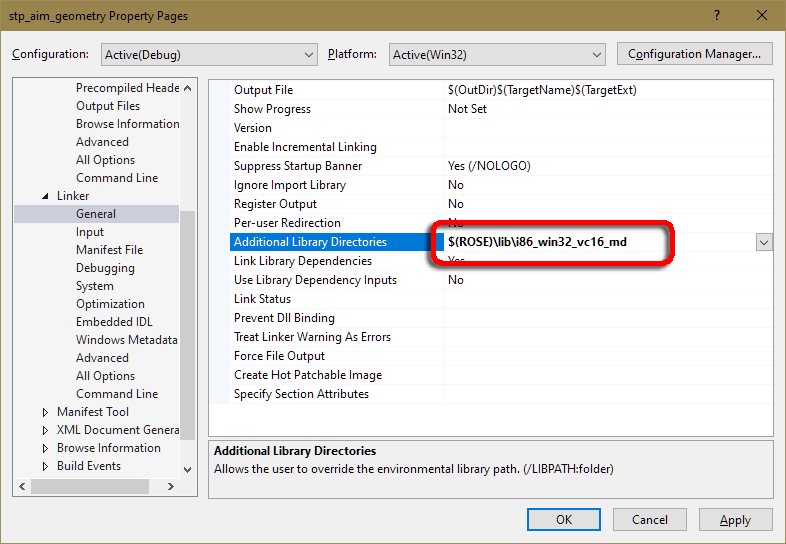
Finally, you must tell the linker where to find the library files. The STEP Tools® software installation for Windows contains programming libraries built for use with Visual Studio 2022 (VC17), Visual Studio 2019 (VC16), Visual Studio 2017 (VC15), Visual Studio 2015 (VC14), Visual Studio 2013 (VC12) or Visual Studio 2012 (VC11) using the /MD flag. These are kept in different subdirectories under the STEP Tools® software "lib" directory. The library directories for Visual Studio are as follows:
$(ROSE)\lib\i86_win32_vc17_md(Visual Studio 2022, 32bit platform, /MD)$(ROSE)\lib\x64_win64_vc17_md(Visual Studio 2022, 64bit platform, /MD)$(ROSE)\lib\i86_win32_vc16_md(Visual Studio 2019, 32bit platform, /MD)$(ROSE)\lib\x64_win64_vc16_md(Visual Studio 2019, 64bit platform, /MD)$(ROSE)\lib\i86_win32_vc15_md(Visual Studio 2017, 32bit platform, /MD)$(ROSE)\lib\x64_win64_vc15_md(Visual Studio 2017, 64bit platform, /MD)$(ROSE)\lib\i86_win32_vc14_md(Visual Studio 2015, 32bit platform, /MD)$(ROSE)\lib\x64_win64_vc14_md(Visual Studio 2015, 64bit platform, /MD)$(ROSE)\lib\i86_win32_vc12_md(Visual Studio 2013, 32bit platform, /MD)$(ROSE)\lib\x64_win64_vc12_md(Visual Studio 2013, 64bit platform, /MD)$(ROSE)\lib\i86_win32_vc11_md(Visual Studio 2012, 3 2bit platform, /MD)$(ROSE)\lib\x64_win64_vc11_md(Visual Studio 2012, 64bit platform, /MD)
Select the Linker category of properties and, pick the General options under that. In the Additional Library Directories property, add the appropriate STEP Tools® software library directory.
Check the STEP Tools® software release notes and install directory for the available versions on other platforms.
Linking To DLLs
STEP Tools® software includes both static and DLL versions of the ROSE C++ library and preinstalled schemas. The instructions above describe how to link an application with static libraries. By making a few changes to your project, you can also link to DLL versions of the libraries.
The import libraries are in the same library directories described above but have a "dll" or "dlld" suffix. The DLL files are located in the STEP Tools® software "dlls" directory and have matching version number in their name. For example, the 64bit ROSE library for Visual Studio 2017 has:
Import library ==> $(ROSE)/lib/x64_win64_vc15_md/rosedll.lib
DLL file       ==> $(ROSE)/dlls/rose_x64_vc15.dll
Visual Studio 2022 import libraries are in the "vc17_md" library
directories. The DLL files include the "i86_vc17" or "x64_vc17"
symbols in their name and use VCRUNTIME140.DLL. Visual
Studio 2015-2022 use the same C++ runtime.
Visual Studio 2019 import libraries are in the "vc16_md" library
directories. The DLL files include the "i86_vc16" or "x64_vc16"
symbols in their name and use VCRUNTIME140.DLL.
Visual Studio 2017 import libraries are in the "vc15_md" library
directories. The DLL files include the "i86_vc15" or "x64_vc15"
symbols in their name and use VCRUNTIME140.DLL.
Visual Studio 2015 import libraries are in the "vc14_md" library
directories. The DLL files include the "i86_vc14" or "x64_vc14"
symbols in their name and use VCRUNTIME140.DLL.
Visual Studio 2013 import libraries are in the "vc12_md" library
directories. The DLL files include the "i86_vc12" or "x64_vc12"
symbols in their name and use VCRUNTIME120.DLL.
Visual Studio 2012 import libraries are in the "vc11_md" library
directories. The DLL files include the "i86_vc11" or "x64_vc11"
symbols in their name and use VCRUNTIME110.DLL.