Overview
The STEP-NC DLL contains a Windows Forms control for geometry viewing. To use it, first create your .NET Windows Forms project and add a reference to the STEP-NC DLL.
Add GeomView to the Toolbox
The DLL contains a Windows Forms control for geometry viewing, but
you must manually add it to the toolbox as described below before you
can use it in the Visual Studio GUI Designer.
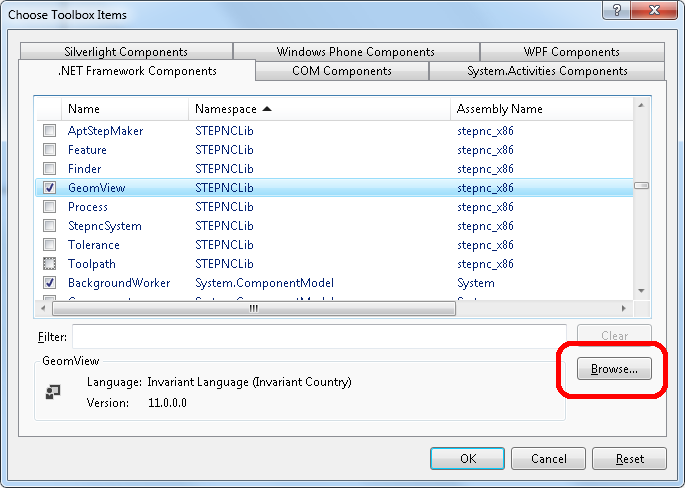
Open the Visual Studio Toolbox pane. Right click and select Choose Items .... This will open the dialog shown below.
Select the .NET Framework Components tab, then click Browse.
Navigate to the STEP-NC Machine installation under "Program Files (x86)\STEP Tools\STEP-NC Machine" and pick the stepnc_x86.dll file.
You can click on the Namespace column and find all of the "STEPNCLib" classes. Make sure that GeomView is checked.
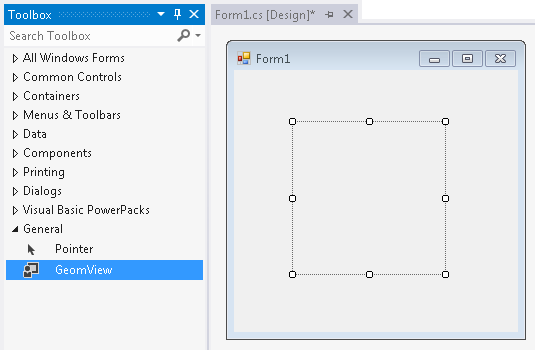
The GeomView control will now appear in the Toolbox under the General tab and can be added to your 32bit or 64bit STEP-NC Programs. The control remains in the toolbox and can be used.
Use GeomView in Your Program
IMPORTANT — Set your project to the x86 configuration when using the Visual Studio form designer. Visual Studio is a 32bit application, so trying to use any x64 native DLL in Design View will fail with an obscure "Could not find type" error. This long-standing limitation only affects the Visual Studio form designer. You can still view code, build, and run with both x86 and x64 configurations.
Add a GeomView control to your Windows Forms application by dragging it from the toolbox into your dialog.
The control gives fine-grained viewing control for STEP-NC files. The code below shows an example of a button click event that will load a file into the control.
The LoadSTEPFile() call tells the control to read a STEP-NC file or reinitialize itself from a file already in memory.
The DisplayMode property is set to VIEW is for displaying individual workpieces and you can use the DisplayInstance() function to toggle workpieces on and off.
To display a plain STEP file you must first create a new project and then import the file as a workpiece using the APT class, then tell the viewer to load the same project name, then use DisplayInstance to turn on the individual product.
STEPNCLib.AptStepMaker apt = new STEPNCLib.AptStepMaker();

private void button1_Click(object sender, EventArgs e)
{
    OpenFileDialog dlg = new OpenFileDialog();
    dlg.Title = "Open STEP File";
    dlg.Filter = "STEP-NC Files (*.stp;*.step;*.p21*.stpnc)|*.stp;*.step;*.p21;*.stpnc|" +
	    "All Files (*.*)|*.*";

    if (dlg.ShowDialog() == System.Windows.Forms.DialogResult.OK)
    {
	apt.OpenProject("stepnc_wrapper");
        apt.Workpiece(dlg.FileName);
	geomView1.LoadSTEPFile(dlg.FileName);

	System.Int64 wp = apt.GetCurrentWorkpiece();

	geomView1.DisplayMode = STEPNCLib.GeomView.DisplayModeValue.VIEW;
	geomView1.ViewSingleProduct(wp);
	geomView1.ZoomAll();
    }
}
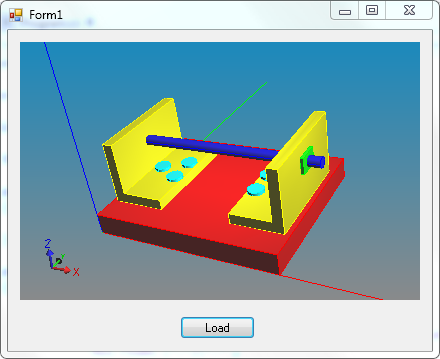
You can get started with a sample C# viewer project that contains the code above. A Visual Basic version is also available.
This example can read and display a plain STEP CAD file. The viewer comes up in rotate mode by default, but you can change the MouseMode property to pan or select items.
You can zoom in or out by assigning a value to the Zoom property. A value of 1 is guaranteed to show the complete bounding box of all shapes. The ZoomAll() function will size the image to fit the currently displayed items.