Description
The STEP Conformance Editor is a hypertext tool that can be used to create, view, explore, and edit STEP data files, and with its built in EXPRESS interpreter can interactively evaluate constraints, global rules and derived attributes.
This tool is an X11 application that is currently only available with the UNIX version of ST-Developer.
Command Line
stepedit [options] [data-file]
The tool recognizes the options shown below as well as the standard set of X11 command line options.
-help- Print this list of options. The tool performs no other action and ignores all other options.
-nocheck- Disable the EXPRESS interpreter. Under this option, only the explicit attributes will appear in the panes. The tool will not try to display or evaluate constraints or derived attributes.
-panes <number>- Controls how many display panes the editor initially has. The default is two. Panes can also be added or removed with the buttons at the bottom of the window.
-trace- Turn on printing of the EXPRESS interpreter execution log. This causes detailed tracing of the flow of control through the WHERE rules, and functions. Use this if the tool seems to be having trouble with a particular construct. This option in only available for stepedit.
Starting the Editor
The STEP editor must be started on an X11 display. Be sure that your $DISPLAY environment variable is set correctly.
The editor needs the data dictionary files (<schema>.rose) and precompiled parse data files (<schema>_EXPX.rose) for your EXPRESS schema.
If these files are not present in the ST-Developer systems_db/schemas area, you must generate them. Use the EXPRESS compiler control panel or call the compiler on the command line:
% expfront -rose [options] <express_file_name>
See Generate Data Dictionary and Precompiled Schemas for more information. For best results, copy the dictionary and parse data files to the ST-Developer systems_db/schemas area so that they are available to all applications. Now you can invoke the editor:
% stepedit
To view a particular STEP file, use the command:
% stepedit <data-file>
If the STEP file is in the search path, the editor will read this file into memory to start the session.
Visual Layout
The editor displays STEP objects as formatted text, using the X Window System to implement a mouse-driven user interface. Most of the editor operations are invoked by clicking on buttons or pieces of text, called action tags , within the editor display.
The main editor window contains several panes, each of which can display a single STEP object. As you move through a STEP model, the editor keeps a trail of objects you have descended through. The panes act as a window onto this list. Each pane has horizontal and vertical scroll bars for objects which are too large to fit entirely within the pane. Beneath the panes are buttons which perform additional functions.
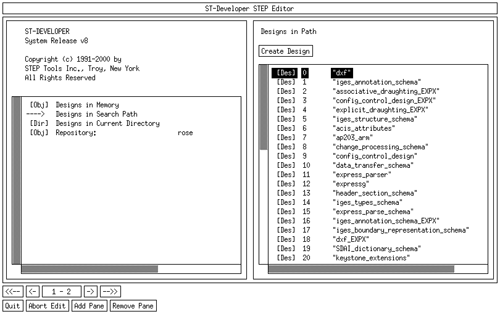
Stepedit Main Window
Message Bar
At the top of the main editor window, you will notice a message bar. This will display instructions and error messages where appropriate. If the editor seems to be acting strangely, or if it beeps, check the message bar to see if there is an error message.
Scroll Bars
To use the scroll bars, click the left mouse button to move forward, the right to move backward, and the center to "pick up" the indicator and move it to a particular spot.
Buttons
As you move through a STEP model, the editor keeps track of the objects you visit. In effect, this list is the path that you followed to get to your current position. The panes act as a viewing window on this sequence of objects. The arrow buttons may be used to position the viewing window on this sequence.
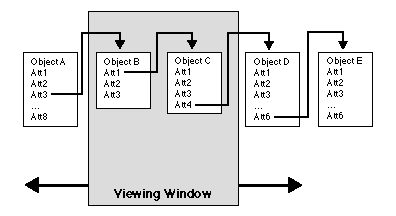
Window Stack
<-<-- Moves the viewing window to the start of the list. This is the pane that displays the list of designs. This can also be accomplished by Ctrl+`<'.
<-- Moves the viewing window one object to the left, if possible. This may also be done with `<'
->- Moves the viewing window one object to the right, if possible. Anytime that a new object is selected, all panes beyond the current one are replaced. This may also be accomplished by typing `>'
->->- Moves the viewing window to the last object in the list. This may also be accomplished by typing Ctrl+`>'
Pressing the arrow keys moves the highlighted area around the display. Pressing a left or right arrow key moves the highlight to the next or previous panel. If the panel is the last visible in the window, the window is scrolled as if the <- or -> button had been clicked. The full set of navigation keys is:
<Shift+←>- Shift all panes one slot to the left. (Same as the <- button).
<Shift+ →>- Shift all panes one slot to the right.
<←>- Move the highlight one pane to the left, scrolling if necessary.
<→>- Move the highlight one pane to the right, scrolling is necessary.
<↑>- Move the highlight one line up
<↓>- Move the highlight one line down.
<Tab>- Toggle between the top and bottom sections of a pane.
In addition to the arrow buttons, there are a number of other buttons or indicators that you will find at the bottom of the main editor window:
Panes- The Panes "button" has no effect, but shows your current position within the list of objects. The add pane and remove pane buttons allow you to customize the appearance of the editor. By adding a pane, more objects can be viewed, by removing a pane, the need to scroll can be minimized. The `+' and `-' keys may also be used to add and remove panes.
Quit- The quit button will dismiss the editor. A dialog box will verify that you really want to quit. You may also use the <Q> key for the same action.
Abort Edit- The abort edit button will stop an edit, delete, or insert operation (text box on screen) as will the <Esc> key, or a mouse click elsewhere in the window.
Object Display Panes
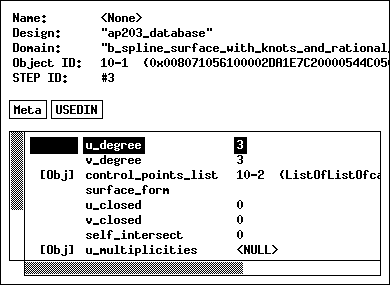
The format of a display pane varies across different types of objects. A complete description of each different type can be found in the final section. All panes, however, have the following elements in common:
- A header, containing common information. For example, the header for STEP objects contains the object's name, design, domain, and object identifier.
- Action tags, such as [save] and [insert], that are appropriate to the object. These are located below the header, and generally appear only if the object is writable. Clicking on the tag will perform the action.
- Instance variables contained by the object. These entries are arranged in three columns. The rightmost column contains the data values, the middle column contains the attribute name or index within an aggregate, and the leftmost column contains navigation tags, if any are appropriate.
Display Pane
Headers
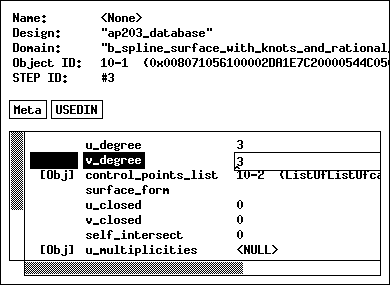
The top section of each object display pane provides general information about the STEP object. The fields you will see are:
Name- Each design keeps a list of named objects. If an object has been given a name, the editor will always refer to it by name instead of object identifier. This field shows the object's name, if it has been given one. To give an object a name, or to change an existing name, edit this field. To remove an object's name, set this field to <NULL>.
Domain- Each object has a particular type associated with it. The domain field shows the object's type. An object can be mutated to a new type by changing this field. However, this may violate constraints on the data model, so this option should be used with care. It is not possible to mutate aggregates.
Permission- The permissions field identifies the object as either writable or read-only. This field may not be changed.
Object Identifier (OID)- The OID field contains the unique identifier for the object -- its OID. Two values are given here: the short OID, and the long OID. The short OID is simply a shorthand form of the long OID and is only valid this session, while the long OID will always be valid, in any session.
STEP File ID- This is the entity ID of the STEP file. This field only appears on entities (RoseStructures), and only when the data was read in from a STEP Part 21 file. This is useful when cross referencing data between the STEP editor and the Part 21 file.
Action Tags
Each different type of object may have a certain set of actions associated with it. Generally these are made available to you as "action tags" -- selectable pieces of text within a display pane. An action tag can be recognized by the convention of enclosing the text within brackets. Clicking on the tag with the mouse will cause the action to be performed. All action tags have keyboard shortcuts, which are given after the tag's name.
[Create design] / <C>- Creates a new design in the workspace. You will be prompted for a design name. The design will be created, and displayed in the next pane. Found on lists of designs.
[Delete] /<D>- Removes an element from a list. Click on the element you wish to delete. Found on dictionary and aggregate panes.
[Delete object] /<D>- Deletes an object from the design. Click on the element you wish to delete. Found only on the "All Objects" pane of a design.
[Insert] /<I>- Add an element to a list. Click on the location within the list of elements. An edit box will appear for the new value. Found on dictionary and aggregate panes.
[Meta] /<T>- Display the compiled EXPRESS definition for the object in the next pane. Found on the pane of any STEP object.
[Move] /<M>- Move an element within a list. Click the element to move and then on the new location within the list of elements. Found on aggregate panes.
[New object] /<N>- Create a new object in the design. Prompts you for the domain name. See Creating Objects for more information. Found only on the "All Objects" pane of a design.
[Save] /<S>- Save the design to secondary storage. Found on design panes only if the design is writable
[USEDIN] /<U>- Compute and displays a list of the objects that reference the displayed object in the same design. Found on the pane of any STEP object.
Instance Variables
At the bottom of each pane is a scrollable list of the instance variables associated with this object.
The first list may contain some "navigation tags". These indicate that the instance variable contains a reference to more information of some kind. Clicking on the tag, or pressing return when a line containing the tag is highlighted will move the focus to the information in question. The action tag indicates the type of information being offered. The tag [OBJ] means a STEP object, [DES] means design object, and [DIR] means a directory of files.
The second list usually shows attribute names. The display for aggregates contains an index. In SELECTS and dictionaries, this field can be changed by clicking on it, or by typing <Shift+E>.
The third list shows the value of each instance variable. This value may be changed by clicking on it, or pressing <E> on the keyboard. If the object is writable, an edit box will appear and you may type in the new value.
Objects are displayed by name if they have one, or by (short) object identifier. The type of an object is displayed after it's OID in parentheses. See the section Primitive Data for the display format of each type of data values.
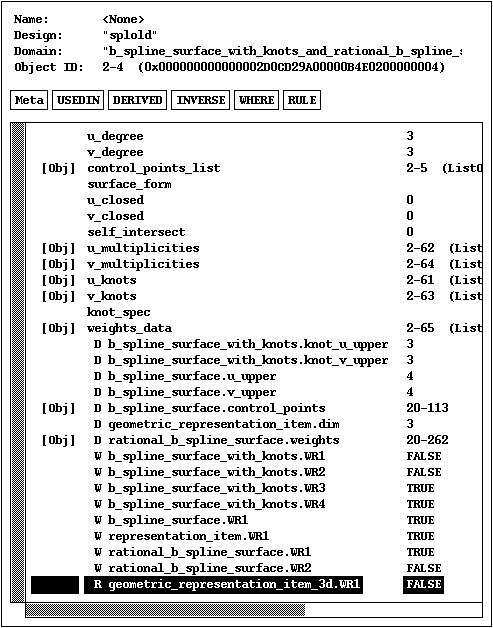
Constraints and Derived Attributes
Constraints and Derived Attributes
The stepedit tool displays entity instances with information about optional attributes, derived attributes, where rules, and global rules.
Each calculated attribute takes one line in the display. Each of these lines has the basic form of:
[*-][DIWR] <Attribute name> <Attribute Value>
The meanings are:
    '*'   Optional attribute
    '-'   Potentially needs updating
    'D'   Derived attribute
    'I'   Inverse attribute
    'W'   Where rule
    'R'   Global rule
    '?'   Indeterminate value.
The tool will list, normal attributes followed by derived attributes, then Inverse attributes, then local where rules, and finally global rules.
For all of the calculated fields (derived attributes, inverses, where rules, and global rules), if the field is inherited, it will prefix the name of the field with the name of the entity that defined the field.
If the field was not given a name the interpreter will construct one for it (eg. 'WR1', 'WR2' ... for where rules).
Before a Calculated field is evaluated (by clicking in it's value column) it will have the value <UNEVAL>. If stepedit encounters an error while calculating the value it will display <ERROR>. If the value is indeterminate, or stepedit is unable to calculate the value, it will put a question mark as its value.
Evaluating Rules and Attributes
Initially, the rules and derived attributes appear as <UNEVAL>. This indicates that the value has not been computed. A minus sign preceding the "D", "I", "W" or "R" means that the value may be out-of-date, and should be recomputed.
To evaluate all rules at once, click on the [WHERE] action tag at the top of the pane. To compute all derived attributes, click on the [DERIVED] action tag (similarly for inverses, and global rules). To evaluate just an individual rule or attribute, click on the value column for that entry. Once evaluation is complete, the minus sign will disappear, or the <UNEVAL> will be replaced with the actual value.
Also note that you can look at the schema information for entities, and can also track down all objects that make reference to this object (among the loaded designs). These are accessed by clicking on the [Meta] and [USEDIN] buttons respectively.
Execution Log
The stepedit tool prints an execution log to standard output. This is a a trace of functions evaluated, return values, errors and warnings. The line number in the EXPRESS file where the problem occurred is included in the error or warning message. The execution log is not displayed for stepedit_v2.
Navigating
The editor uses a navigational interface. You move from object to object by clicking on the "navigation tags" described in the previous section. This section will focus on other the ways to get to objects using the search and index features of the editor.
The editor keeps a record of the most recent path taken through the hierarchy. This record includes the initial window, and the lowest object which you have visited in the hierarchy. Clicking on the buttons which contain double arrows automatically moves you to the window containing the highest (arrows pointing to the left), or lowest (arrows pointing to the right), object in the record. The single arrows move you up and down through the hierarchy one pane at a time. The center button performs no action, but simply indicates which panes are displayed in the window.
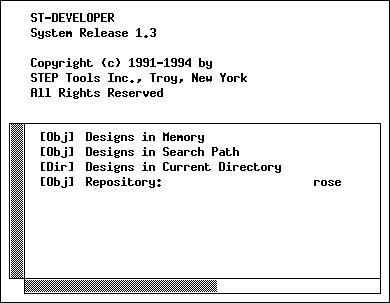
The first pane displayed by the editor contains three lists of designs. These lists store the designs already in memory, the designs in your search path, and the designs in the current directory.
Designs in Memory- A list of the designs that have been loaded into memory by the editor. Initially this list simply contains some system-defined schemas, such as "keystone3_0" that are always present.
Designs in Search Path- A list of the designs that can be found in the search path. If you select one of these designs, it will be read in from secondary storage. If the design is already in memory, it will not be re-loaded.
Designs in Directory- A list of the designs that can be found in the current directory, as well as a list of subdirectories. You can find designs that are not in the search path, by navigating up and down through the directory hierarchy.
Use these lists to finds the design you want. The design will appear in the next pane once it has been read in. This pane contains the search and index features that will let you find and move to the objects within the design.
All Entities- A list of all the entities (RoseStructures) in the design.
All Objects- A list of every object contained within the design. This includes all selects, aggregates, and other objects which may not exist on their own.
Some Objects- A search pane with fields for search criteria. This feature allows for searches based on name and/or type. This is useful for navigating in larger designs.
Named Objects- A list of every object which has been given a name.
STEP Name- A pane containing the name header information from the STEP file.
STEP Description- A pane containing the description of the STEP file. In a Part 21 file, this information is in the header.
STEP Schemas- A list of the compiled express schemas associated with the design. Before you can create an object of a particular type, the schema which defines the type must be added to this list.
Root Object- Some application programs will designate an object as "root," and then use this object as a starting place for navigating to other objects. Only ROSE working form file have a root object. All other files formats (e.g., STEP Part 21) have a NULL root object.
Finding Objects By Some Criteria
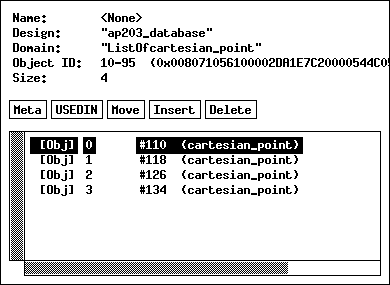
The "Some Objects" pane allows you to search for objects matching some search criteria. These criteria -- a specific name, a domain, a STEP file entity ID, or a "where" clause based on the value of an attribute -- will be matched against all objects in the design. Blank fields will be ignored. If you fill in the domain field, all objects of that type will be listed in the next pane. If the name field is filled in, the object with that name, if it exists, will be shown in the next pane. Once you have filled in the field(s), hit <return> repeatedly or click on the "Select Objects" tag to start the search.
Here we see a search for all objects of type Point. The search has resulted in four objects.
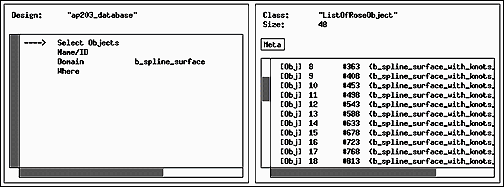
Search By Type
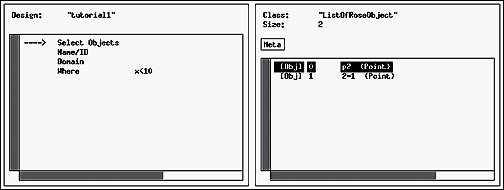
And in the next example, we see a search for all objects named "c1." The search has shown that there is a Circle object with that name. If we had also specified the domain "Point," the search would have been unsuccessful, since the object named "c1" is a Circle.

Search By Name
Likewise, we can also search by STEP ID (line number). Please note that this feature only works for data that was read in from a STEP part 21 file. To do so, type the ID number on the Name/ID line.

Search By ID
In addition to these criteria, the "Some Objects" pane, and several of the commands in the ROSE Database Utility, let you specify a "where clause" to select objects that match constraints based on attribute values and other criteria. Some examples of where clauses:
To select all Points whose X coordinate is less than or equal to 0.0:
domain='Point' and x<=0.0
To select all instances of objects whose entity definition is in the "topology" schema:
this.schema = 'topology'
In the previous example, the keyword "this" was optional. The same query could have also been written as:
schema='topology'
To select all Polygons if the X coordinate of the first vertex is not equal to 0:
domain='Polygon' and this.vertices[0].x <> 0.0
To select all objects in which the label attribute is "A little Picture":
label='A little Picture'
And in the next example, we see a search for all objects with an "x" attribute with value greater or equal to 1. The search has resulted in three Point objects.
Search By Value
The complete syntax for the where clause is:
    <where-clause> = <expr>
    <expr> =
        |	<term>
        |	<term> `AND' <expr>
        |	<term> `OR' <expr>
    <term> =
        |	`(' <expr> `)'
        |	<operand> <rel-op> <operand>
    <rel-op> = `<' | `>' | `=' | `<>' | `>=' | `<='
    <operand> =
        |	<EXPRESS string>
        |	<integer>
        |	<REAL number>
        |	<attr> <recursive-attr-spec>
    <attr> =
        |	`THIS' | `DOMAIN' | `DESIGN' | `SCHEMA'
        |	<an attribute of the object being tested>
    <recursive-attr-spec>
        |	`.' <attr> <recursive-attr-spec>
        |	`->' <attr> <recursive-attr-spec>
        |	`[' <integer> `]' <recursive-attr-spec>
        |	`[' <EXPRESS string> `]' <recursive-attr-spec>
        |	nil.
Editing
This section describes how you can use the editor to modify the attributes of a STEP object, to add new STEP objects, and to remove unwanted STEP objects.
Changing an Attribute Value
An attribute value may be changed by clicking on it. If the object is writable, an edit box will appear and you may type in the new value. Type <return> after you have entered the correct value. If you decide that you do not want to edit the value after all, you can click on the "abort edit" button at the bottom of the window or press the <Esc> key. To save the new value to secondary storage, click the [save] action tag, on the pane for the design.
If a design object is locked, no part of it may be edited. Some action tags that modify a design, such as [new object] and [delete object], appear only if the design is writable.
The editor does not allow schemas to be changed. For this reason, RoseDomains, RoseAttributes, and lists thereof are read-only.
Change A Value
Saving Changes
To save your changes to secondary storage, click the [save] action tag, on the pane for the design.
Edit Box and Key Bindings
The edit box has a number of special key bindings. As discussed earlier, the <Return> key is used to accept a change, and the <Esc> key or the abort edit button can be used to bail out of a change. You can use the arrow keys to move the cursor back and forth. After an edit is completed, and there is no error, the box reappears in the next field that may be changed. The following Emacs-like key actions are also used:
    Ctrl-A    	beginning-of-line
    Ctrl-E    	end-of-line

    Ctrl-B    	backward-character
    Ctrl-F    	forward-character

    Meta-B    	backward-word
    Meta-F    	forward-word

    Ctrl-D    	delete-next-character
    Meta-d    	delete-next-word
    Ctrl-H    	delete-previous-character
    Meta-h    	delete-previous-word
    Ctrl-K    	kill-to-end-of-line
    Ctrl-T    	transpose-characters
    Meta-D    	kill-word

    Meta-H    	backward-kill-word
    Meta-K    	kill-to-end-of-paragraph

    Shift Meta-BackSpace    		backward-kill-word
    Shift Meta-Delete    		backward-kill-word
Primitive Data
The editor recognizes the following forms for data values. In addition to the following forms, the string "NULL" or "<NULL>" may be specified for any data value.
INTEGER- Standard C integer formats.
REAL- Standard C float formats.
STRING- The string may optionally be surrounded by single or double quotes. If it is not, however, all leading and trailing whitespace is removed.
BOOLEAN- Accepts [t]rue, [f]alse, [y]es, and [n]o Case insensitive.
LOGICAL- Accepts true, false, unknown. Case insensitive.
BINARY- Accepts a string of hexadecimal numbers.
ENUMERATION- Accepts enumeration values as strings.
Object attributes are slightly different than the primitive attributes. The object attributes contain references to instances rather than the instances themselves. The following forms are used to indicate object references:
<nn-nn>- Refers to the ROSE Object with the shorthand object identifier <nn-nn> in the current design. e.g. <1-25>, <12-156>
<"name" nn-nn>- Refers to the ROSE Object by shorthand object identifier in a foreign design. e.g. <"picture" 1-25>, <"wing" 2-87>
"name"- Refers to the object called "name" in the current design. The quotes are optional.
#nnn- Refers to the object with STEP file line number "nnn." This option only makes sense for data read from STEP Part 21 files.
To fill a field with a new object, type the reserved name "new". The domain of the new object will be taken from the field type. If you want to create a more specific type of object, type "new <domain-name>". The following section gives more information about creating objects.
Creating Objects
The easiest way to create a new object is as an attribute of an existing object. Type in the reserved name "new" and a new object will be created to fill the attribute. The domain of the new object will be taken from the attribute type. If you want to create a more specific type of object, type "new <domain-name>". The newly-created object will be displayed in the next pane.
Objects can also be created from the "All Objects" pane of a design. There is a [new object] action tag. Click on this tag and an edit box will appear in the object list. Fill in the name of a domain. There is no need to type "new." An object of that domain will be created and displayed in the next pane.
New Designs
New designs can be created from within the editor. If you go to any of the top-level lists of designs, you will find a [new design] action tag. Click on this tag and an edit box will pop up. Type in the name that you would like the new design to have. A design object with this name will be created and displayed in the next pane. If a design with that name already exists, no design will be created and an error message will be displayed.
Be sure to fill in the list of schemas with the names of the compiled EXPRESS schemas you would like to use. If you do not specify any schemas the editor will not be able to create any objects in the new design. If you tend to use a fixed set of schemas, you can set up a template so that the list will be automatically initialized.
Templates
Should you need to create large amounts of data with the editor, you can reduce the amount of repetitive data entry you have to do by using templates. You can use templates to set up default values for certain types of entities, and create a complete data set with less effort.
When you create an object, the editor will search for a template object of the same type or a supertype to initialize the new object with. All templates are held in a design called "TEMPLATE". If a template is found, its instance variables are copied to the new object. If the template contains a reference to another template object, that object is also copied.
For example, when creating a Point, the editor will look at the Point template and copy the "x" and "y" coordinates to the new Point. When creating a Line, the editor will look at the Line template and make copies of the Point objects it finds there.
To find a template object, the editor will search the TEMPLATE design for an object with the same name as the new domain. If one does not exist, the editor looks for any object of the new type. For example, if you are creating a Point object, the editor will search the TEMPLATE design for an object named "Point". If there is no such object, the editor looks for the first Point object it can find in the TEMPLATE design. If it still can't find a match, it will repeat the process with the supertypes of Point.
When you create a new design, the editor will copy the schema list from the TEMPLATE design. The editor searches for a TEMPLATE design at start-up. It can be created with the editor, or the "create" option of the ROSE data tools.
Deleting Objects
Objects can be deleted from the "All Objects" pane of a design. There is an action tag called [delete object]. Click on this tag and then click on the object you wish to delete. To cancel the operation press the "abort edit" button.
Specialized Panes
All Designs
The first pane in the editor presents the list of all designs. The copyright info is displayed at the top of the screen.
All Designs
This pane contains three lists of designs:
Designs in memory- a list of the designs that have been loaded into memory by the editor. Initially this list simply contains some system-defined schemas, such as "keystone3_0" that are always present.
Designs in the search path- a list of the designs that can be found in the search path. If you select one of these designs, it will be read in from secondary storage. If the design is already in memory, it will not be re-loaded.
Designs in a directory- a list of the designs that can be found in the current directory, as well as a list of subdirectories. You can find designs that are not in the search path, by navigating up and down through the directory hierarchy.
Design
The design pane offers several access routes to the objects contained within the design. This pane contains a lists of all objects and named objects, a pane to search for all objects of a particular type, and a place to designate a special "root" object for the design.

RoseDesign Pane
All Entities- A list of all the entities (RoseStructures) in the design.
All Objects- A list of every object contained within the design. This includes all selects, aggregates, and other objects which may not exist on their own.
Some Objects- A search pane with fields for search criteria. This feature allows for searches based on name and/or type. This is useful for navigating in larger designs.
Named Objects- A list of every object which has been given a name.
STEP Name- A pane containing the name header information from the STEP file.
STEP Description- A pane containing the description of the STEP file. In a Part 21 file, this information is in the header.
STEP Schemas- A list of the compiled express schemas associated with the design. Before you can create an object of a particular type, the schema which defines the type must be added to this list.
Root Object- Some application programs will designate an object as "root," and then use this object as a starting place for navigating to other objects. Note that only ROSE working form file have a root object. All other files formats (e.g., STEP Part 21) have a NULL root object.
To save the changes to a design, click the [save] action tag. If you quit the editor without saving all your designs, you are given an opportunity to save everything at that time.
Entity
The simplest type of STEP object is the entity. This consists of a number of named fields. The values of each field may be changed.
Select
A select has only one field, but the type and value of the field may both be changed.
Aggregates
An aggregate is a collection of elements of similar type. The four types of aggregates have quite different semantics. Bags are unordered collections; sets are unordered collections without duplicates; lists are ordered collections; and arrays are fixed size collections.
RoseAggregate Pane
List, Bag and Set
To insert a new value into a set bag or list, click on the [insert] tag. Bags and sets are not ordered and will append the new value. An edit box will appear after the last element in the aggregate. Lists are ordered, and so you must click on the place where you would like the new value to go. Type in the new value, and then press <return>. You may also click on the bottom of the list (after the last element), and an edit box will appear. After an insert is completed, the next line is always selected for editing. To quit, press <Esc>, or abort edit.
To delete an element from a list, click on the [delete] tag, then on the item to be removed. The item will be removed from the list.
Array
Arrays are fixed size so the insert operation does not apply. Instead of inserting data into an array, you must change the size of the array and then modify the existing elements. To do so, change the "size" field in the header to reflect the new size. The array will be resized and any new elements will be set to <null>.
Dictionaries
A dictionary is a lookup table between a string and a value. The value can be any type known to ROSE. The list of named objects in a design is a dictionary, so the methods detailed here will also work there.
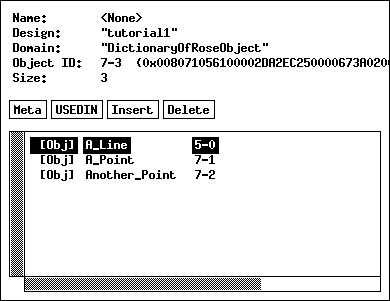
RoseDictionary Pane
A key can be changed, so long as it is unique. To change a name, click on the center list and type a new value.
To add a new value to a dictionary, click on the insert button, then select the place in the dictionary to insert the object. Now, type the name followed by the value. If either is incorrect, it will be rejected with an error message.
To delete a value from a dictionary, click on delete, then select the item to delete. The item will then be removed from the dictionary.
Schema Information
A compiled EXPRESS schema is treated as a regular design object, but it contains only RoseDomains and RoseAttributes. Schemas may not be modified using the editor.
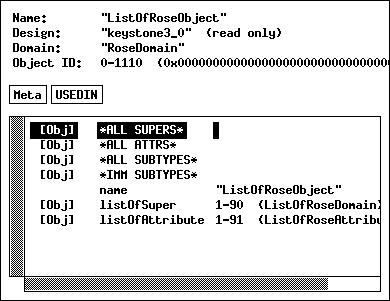
RoseDomain Information
Each compiled data type is represented by a RoseDomain object. The object contains several different lists of super/sub type information and attribute information. The display contains:
ALL SUPERS- All Supertypes, from RoseObject down
ALL ATTRS- All Attributes
ALL SUBTYPES- All subtypes
IMM SUBTYPES- The immediate subtypes,
ListOfSuper- The immediate supertypes.
ListOfAttribute- The immediate attributes